What Is Google Tag Manager? Google Tag Manager Setup Guide
Learn what Google Tag Manager is, how it works, and how to set it up step by step to track user behavior and conversions without editing site code.


To reach marketing goals and drive more sales, the most important job is paying close attention to customer behavior and needs. You can predict and analyze customer needs in many ways. In this article we will take a detailed look at how Google Tag Manager is used and how to set it up.
Suppose you run an e-commerce website, and understanding what your users need through that site would positively influence your sales strategy.
As you know, one of the most important factors here is collecting as much information as possible about user behavior and analyzing it correctly. That way, you can put the data to work efficiently and serve your users better. To collect user behavior data and turn it into meaningful conclusions, Google Tag Manager is extremely useful. Tag Manager is, quite simply, one of the best online tools for gathering information from your users.
What is Google Tag Manager?
To put it plainly, Google Tag Manager is a free Google tool that lets you pull the information and data you want into Google Analytics by placing just a few lines of code on your website.
In essence, Tag Manager helps you manage the tags placed on the pages of your websites and apps. Using Tag Manager is straightforward, and it helps you collect more accurate data from your site.
One of the most practical things about Google Tag Manager is that it does not alter your site code, and you never need to modify your site code to collect the customer behavior data you need.
Working in integration with Google Analytics and Google Ads, Google Tag Manager does more than help you track detailed visitor statistics. It also contributes to interpreting the conversions generated by your promotional and advertising activities.
Known as a completely free tool, Google Tag Manager lets you manage a large number of websites from a single account. Multiple functions of the tool can also be used comfortably at the same time.
Available for both websites and Android and iOS apps, Google Tag Manager:
- Lets you manage all the scripts and tags added to your website from one place.
- Controls which tags fire under which conditions.
- Works smoothly with Google products as well as third-party integrations such as Criteo and Crazy Egg.
- Keeps your website tags organized and prevents clutter.
Advantages of Google Tag Manager
If you constantly write code to collect user data and analyze behavior, the work is not only hard; it can also cost you money and time. On large sites, doing this page by page is practically impossible.
Beyond that, managing a large number of hand-placed tags becomes nearly unmanageable, and you end up without the output you wanted. Google Tag Manager solves this and gives you the following benefits:
- Ease of use
Using Google Tag Manager is simple: users can add tag manager snippets to site pages without making any changes to the site code itself.
- Editing and testing before publishing
If you suspect the code you entered will not work properly, or you simply want to see how it behaves, the Google Tag Manager preview mode lets you see exactly how it runs before it goes live.
- Simpler site updates
One of the best features of Tag Manager is that it lives separately from your site and app, letting you do whatever is needed in its own environment. Website updates, plugins, interface changes, and more can therefore roll out to the site and app very quickly.
- User management and permission levels
Another advantage of Tag Manager is granular permissions: for better control, you can set user permission levels and define who is allowed to make changes to the website and the tag containers.
- Built-in tags
Another key feature of Tag Manager is that it ships with many essential tags by default, so you can use them even if you cannot write code. Editing and customizing these templates is also easy.
Disadvantages of Google Tag Manager
Alongside all the good things we have said about this free tool, Google Tag Manager has weaknesses worth mentioning:
- Turnkey tags are limited:
Turnkey tags are tags created through forms instead of pasting JavaScript code. Because these tags are limited within Google Tag Manager, analyzing a website without Google Analytics becomes very difficult.
- No dedicated support team:
Another issue with Google Tag Manager is that direct help from Google is hard to come by.
How is Google Tag Manager used?
As we said, Google Tag Manager is a tool with many applications. While it is mostly used to collect data on user decisions and customer behavior, it can also be used to:
- Install Google Analytics with the help of Google Tag Manager
- Place required code in the site header
- Add custom tags without writing code
- Track different events
- Verify Google Search Console using Google Tag Manager
- Send the required data to Google Analytics and other analytics tools
What are the components of Google Tag Manager?
- Tags: Tags let you define what happens in your website's content and how users interact with it. By creating multiple tags you can comfortably track user conversions. When you enter the Tags section in Google Tag Manager, you need to complete the "Tag Configuration" and select a "Trigger".
- Triggers: Triggers are the rules that tell tags when to fire. They process events such as clicks, form submissions, and page loads. When you enter the Triggers section in Google Tag Manager, you need to complete the "Trigger Configuration".
- Variables: Variables are the values that triggers need in order to work. Attributes such as product name, date, and price are examples of variables.
How to set up Google Tag Manager
Installing Google Tag Manager is very easy. All you need is a Google or Gmail account; sign in and within a few minutes you can add the tags you want to your website, app, or AMP pages.
Step 1: Go to the Google Tag Manager sign-up page
As a first step, open the Google Tag Manager account page.
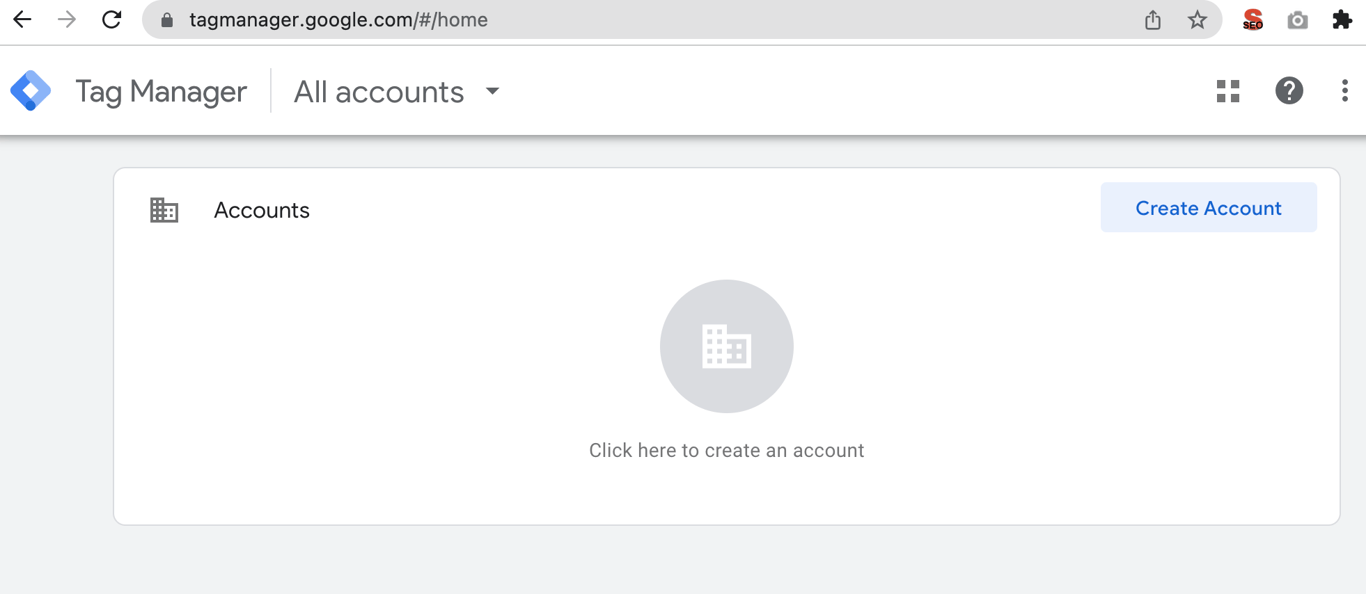
Step 2: Create your Google Tag Manager account
After clicking Create Account, you will be taken to the Google Tag Manager account creation page. Enter your company or website name in the Account Name field and click Continue.
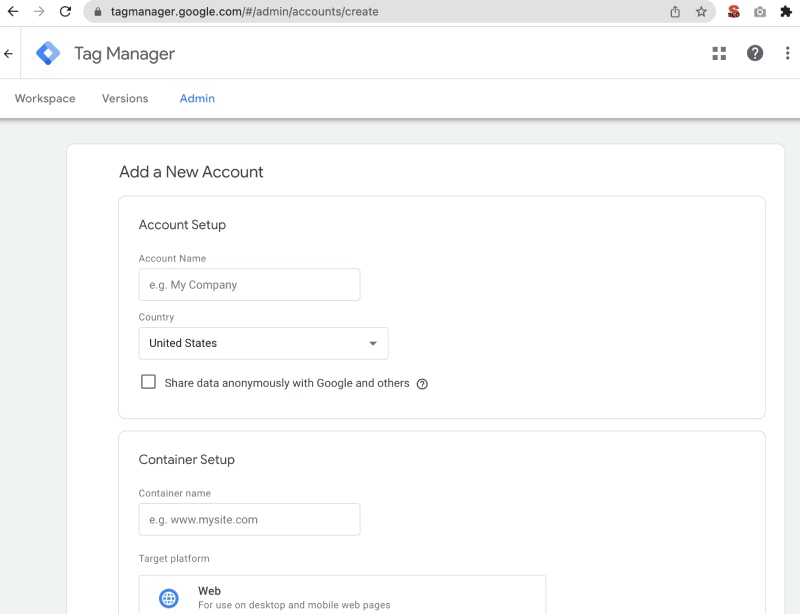
Step 3: Create a Google Tag Manager container
A container is the environment where you manage all your tags. Enter your site name in the field provided. There is no need to type http or https in front of the website name. Then select the website type and click the Create button.
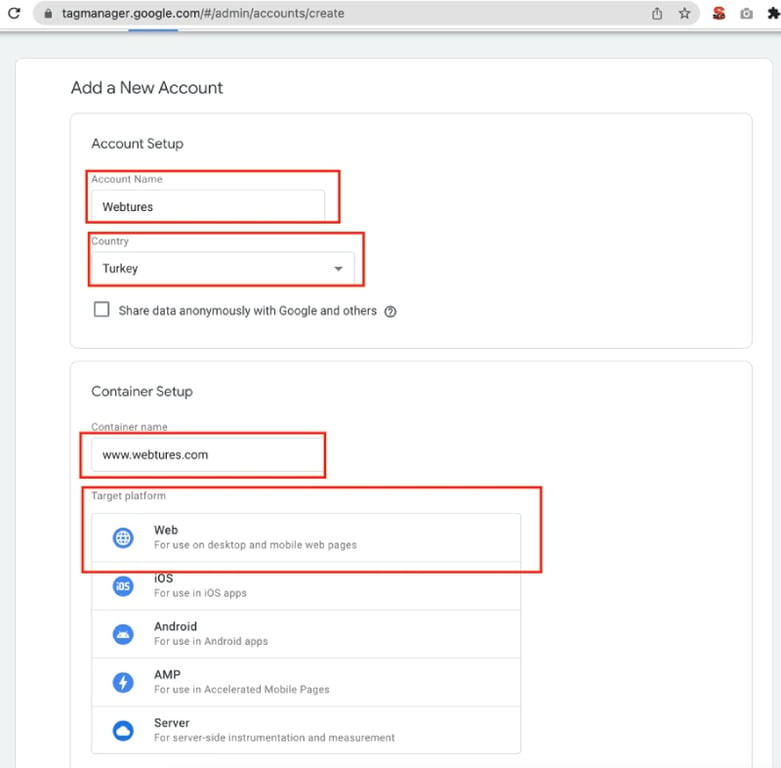
Step 4: Accept the terms of service
In the next step, the Terms of Service will be displayed; click Yes to accept them.
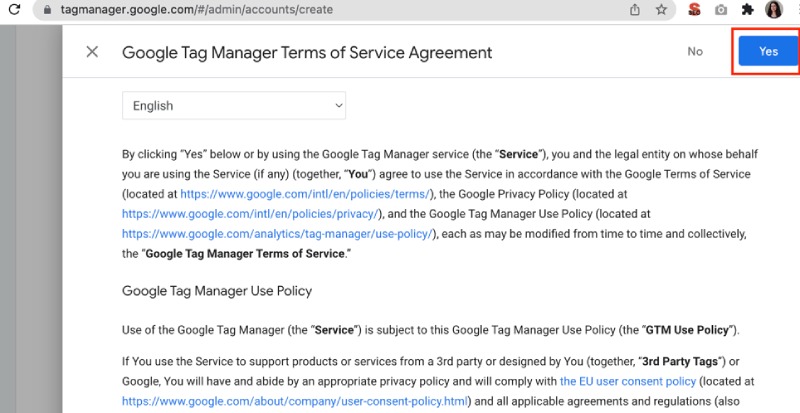
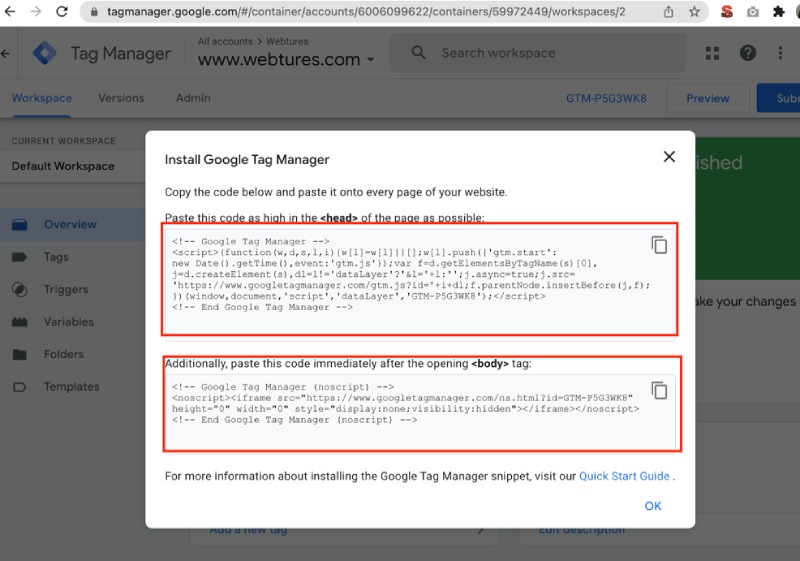
Step 5: Install Google Tag Manager
Next, you need to place the code snippets you are given into your website. You can get help from a developer for this step.
Step 6: Verify the Google Tag Manager container code
After deploying Tag Manager, you may also want to check whether the tracking code is working properly on every page. Many tools exist for this. One of them is the gachecker website, which is suitable for small, everyday sites of up to 10,000 pages. The tool checks the tracking code across all pages and identifies which pages contain it.
What is the biggest mistake made when using Tag Manager?
Before using Tag Manager, make sure you audit your existing tags, and if other tags are present, define a plan for how data and statistics will be transferred.
For example, if Universal Google Analytics is already installed on different pages of your site and you then add the same GA4 measurement a second time through Tag Manager, neither snippet will work correctly.
Loading two identical tags on the same page accidentally doubles pageview counts and records misleading bounce rate statistics.
Tags outside Tag Manager may already have been added through WordPress plugins, Joomla, Magento, or another CMS. Make sure you check for those as well.

Let us make your brand visible in AI search.
Share your goals, we'll come back with a custom growth plan within one business day. A strategy lead will reach out personally.
Get in touch